Use this guide to optimize your Windows computer to reduce the chances of facing issues during recording sessions, or as a starter if you have any issues. There are several settings you can change and tools you can install to help improve your computer's performance, achieving lower latency, and better plugin performance.
Make sure you have the latest audio and video drivers
Updating your drivers is a simple process. Your components likely have software that can check for and install updates automatically. Be sure to check the websites of your hardware manufacturers and check that you have the latest drivers installed.
Change your Power Options to High Performance
Start > Type “Control Panel” and click it > Hardware and Sound > Power Options > Select “High Performance”.
In both cases, while verifying this, make sure your energy plan does not suspend your devices automatically. Click on “Change plan settings”, then click on “Change advanced power settings” and check the following:
Expand “USB Settings” and “USB Selective suspend settings” > Change it from “Enabled” to “Disabled”.
Expand "Processor Power Management" and make sure that both "Minimum processor state" and "Maximum processor state" are set to 100%.
Expand "Hard Disk" > "Turn off hard disk after" > Change it to "Never".
Expand "Sleep" > "Sleep after" > Change it to "Never".
Expand "Display" > "Turn off display after" > Change it to "Never".
Apply and OK.
Verify the correct Audio Device is enabled
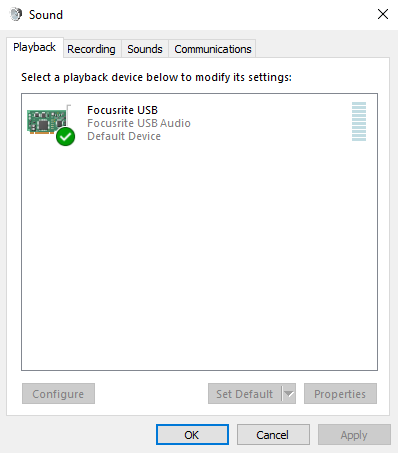
Start > Type “Control panel” and click it > Hardware and Sound > Sound.
In both cases, your audio device should be enabled with a green checkmark on the “Playback” and “Recording” tabs. If you use Windows 10, you can access a similar page by clicking on Start > Settings > System > Sound. Make sure you only have one audio device running at a time in both Playback and Recording tabs.
Disable USB Power Management
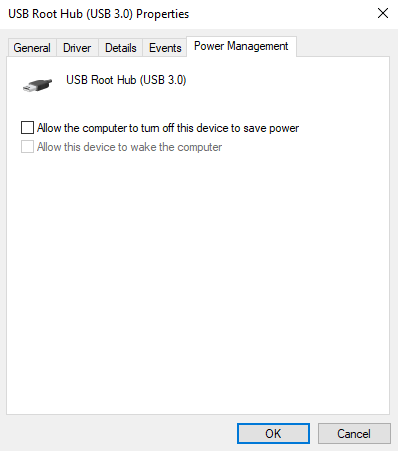
Start > Type “Control panel” and click it > Hardware and Sound > Devices and Printers > Device Manager.
After opening Device Manager, expand “Universal Serial Bus Controllers” and double click on every USB item, unchecking the box that says “Allow the computer to turn off this device to save power” located under the Power Management tab.
Disable unnecessary startup and background programs
Check the Performance tab on Task Manager (Ctrl+Shift+Esc). If you get more than 1%-3% constant CPU Usage while idle, it is a good idea to disable any background processes that could affect your performance. A good place to start is disabling non-essential third-party software.
Most computers have pre-installed software that can significantly affect your system performance. You can disable unwanted start-up programs by doing the following:
Press Ctrl+Shift+Esc on your keyboard to open the Task Manager.
Go to the “Startup” tab.
Right-click any unwanted process and select "Disable".
Alternatively, you can go to Start > Settings > Apps > Startup and do the same.
If you are unsure what any of these processes are, a Google search for them will reveal more information.
You should only disable third-party programs that are not part of your usual workflow. Avoid disabling startup programs related to your main devices.
You can also go to Start > Settings > Apps & Features / Default Apps and disable or uninstall any unnecessary applications.
Scheduled Tasks
If you experience sudden drops in performance that seem to vanish after a while, they might be caused by a Scheduled Task running in the background. You can manually disable the ones that you think are interfering with your workflow:
Type "Task Scheduler" in the Start Menu search or go to Control Panel > Administrative Tools > Task Scheduler.
In the Task Scheduler library, you can find common programmed tasks, such as browser updaters, system analysis conducted by third-party software, and maintenance processes (like Disk Defragmentation). Disable the ones that you think are affecting your performance while not disabling essential tasks.
If you have doubts about a specific task, a quick Google search should tell you if it's safe to disable it.
Measure your system stability
Check the latency of your system and see if it’s capable of handling real-time audio applications without dropouts. LatencyMon is a free Windows tool that measures system latency to determine if a PC can handle real-time audio and high-performance tasks without stuttering. It identifies faulty drivers or processes causing Deferred Procedure Calls (DPCs) and Interrupt Service Routines (ISRs), which lead to audio dropouts or DPC spikes. For CPU benchmarks and temperate measurement, you can use CPU-Z and CoreTemp.
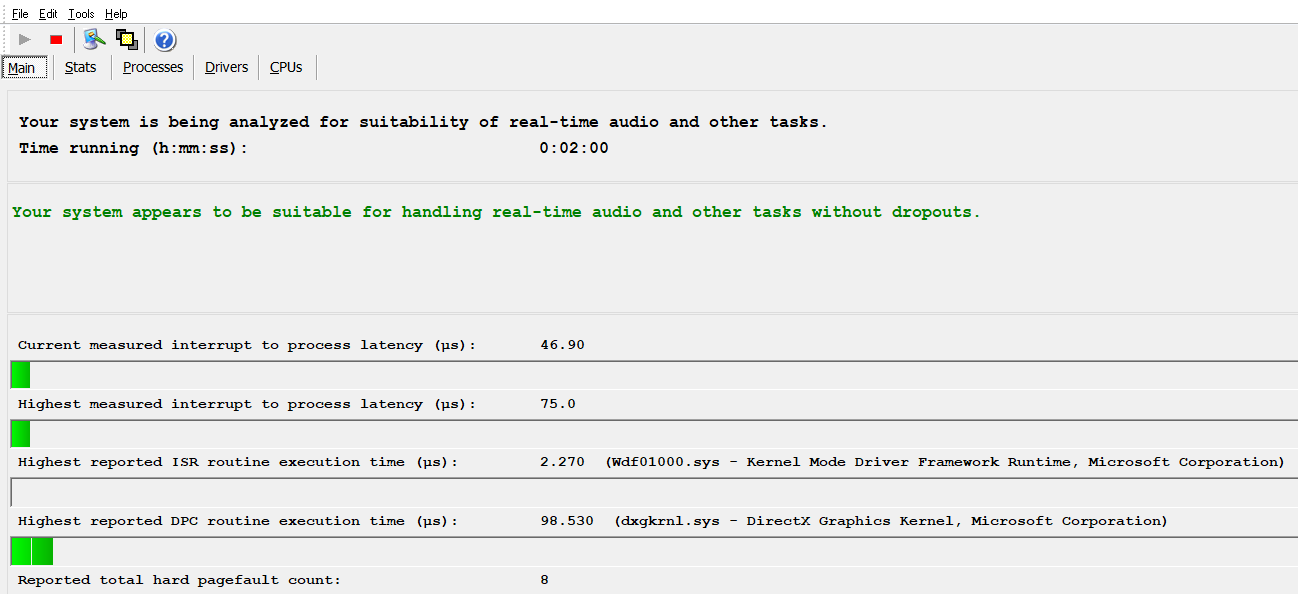
Verify if there's any irregularity while monitoring these programs, such as bumps in latency, CPU usage, or high temperatures.
BIOS Settings
If you're using an audio interface as the default device, disabling onboard audio is recommended.
Many CPU power management features can affect the real-time performance of your system. It may take a bit of trial and error to check if disabling them improves the performance. Features like Turbo Boost, Cool'n'Quiet, and C-States power-saving modes are worth exploring.
Many options found in the BIOS can dramatically affect your system, so make sure to modify the settings you are familiar with. Again, Google anything you're not sure about.
Additional Actions
It is good practice to delete software you don’t use. Some users experience improvements in performance after disabling Windows Visual Effects, system sounds, and setting processor scheduling to background services:
Disable Windows Visual Effects: Open Control Panel > Enable "Icon View" and click on “System” > Select “Advanced System Settings” > Under the “Advanced Options” tab, locate “Performance” and click on “Settings” > Under the “Visual Effects” tab, check “Adjust for best performance”. Click “Apply” and “OK”.
Disable system sounds: Open Control Panel > Enable "Icon View" and click on “Sound” > Under the “Sounds” tab, locate “Sound Scheme” > Select “No sounds”. Click “Apply” and “OK”.
Set processor scheduling to background services: Open Control Panel > Enable "Icon View" and click on “System” > Select “Advanced System Settings” > Under the “Advanced Options” tab, locate “Performance” and click on “Settings” > Under the “Advanced” tab, set the processor to “Background services”. Click “Apply” and “OK”.
Disable Game Mode: Start > Settings > Gaming > Game Mode > Move the switch to "Off".
Adjust the power mode of your video card (NVIDIA): Right-click on the desktop > Open the NVIDIA Control Panel > Manage 3D settings > Set the Power management mode to "Prefer maximum performance".
Uninstall power management-related software (common on laptops): These are common sources of real-time performance drops.